How to Install and Configure a Personal FTP Server Using VSFTPd on Ubuntu
Have you ever wanted to setup a simple FTP server so that you can upload files to your remote server for yourself, or a few users? VSFTPd is the perfect option for you. It’s a powerful, open source FTP server that is designed to be quickly and easily configured.

In this article, we’ll show you how to setup VSFTPd on Ubuntu so that you can create your own personal FTP server.
Prerequisites
In order to setup an FTP server, you’ll need a Hybrid, Cloud, or Dedicated Server from ServerMania. We have a variety of hosting solutions to choose from at ServerMania.com.
Not sure which server is best for you? Book an expert consultation today, and we’ll find the perfect server for your needs and budget, guaranteed.
This article was created using Ubuntu 16.04. Instructions may vary based on the version of Ubuntu you are running on your server.
Installing VSFTPd
Step 1: Login to the server via SSH
ssh ubuntu@SERVER-IP
Step 2: Change into the root user
sudo su
Step 3: Install VSFTPd
apt-get install vsftpd -y
Step 4: Start VSFTPd and set it to start on boot
systemctl start vsftpdsystemctl enable vsftpd
Step 5: Create a user for FTP access
adduser vsftp
Step 6: Make an FTP directory and set permissions
mkdir /home/vsftp/ftpchown nobody:nogroup /home/vsftp/ftpchmod a-w /home/vsftp/ftp
Step 7: Create an upload directory and set permissions
mkdir /home/vsftp/ftp/testchown vsftp:vsftp /home/vsftp/ftp/test
Configuring VSFTPd
Step 1: Backup the configuration file
cp /etc/vsftpd.conf /etc/vsftpd.conf.bak
Step 2: Open the configuration file in your favourite text editor
vi /etc/vsftpd.conf
Step 3: Add the following lines to the file, then save and close the file:
listen=NOlisten_ipv6=YESanonymous_enable=NOlocal_enable=YESwrite_enable=YESlocal_umask=022dirmessage_enable=YESuse_localtime=YESxferlog_enable=YESconnect_from_port_20=YESchroot_local_user=YESsecure_chroot_dir=/var/run/vsftpd/emptypam_service_name=vsftpdpasv_enable=Yespasv_min_port=10000pasv_max_port=11000user_sub_token=$USERlocal_root=/home/$USER/ftpuserlist_enable=YESuserlist_file=/etc/vsftpd.userlistuserlist_deny=NOrsa_cert_file=/etc/cert/vsftpd.pemrsa_private_key_file=/etc/cert/vsftpd.pemssl_enable=YESallow_anon_ssl=NOforce_local_data_ssl=YESforce_local_logins_ssl=YESssl_tlsv1=YESssl_sslv2=NOssl_sslv3=NOrequire_ssl_reuse=NOssl_ciphers=HIGH
Step 4: Add the FTP user to VSFTP
vi /etc/vsftpd.userlist
Add the following line, then save and close the file:
vsftp
Step 5: Create a certificate to connect via SSL
mkdir /etc/certopenssl req -x509 -nodes -days 365 -newkey rsa:2048 -keyout /etc/cert/vsftpd.pem -out /etc/cert/vsftpd.pem
Step 6: Restart VSFTP
systemctl restart vsftpd
Connecting to the FTP Server
You can now visit ftp://YOUR-SERVER-IP and login using the username and password you created earlier in order to view files uploaded.
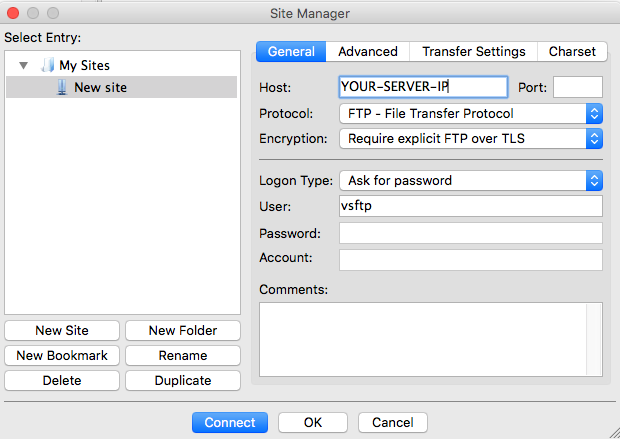
In order to upload files, you can use an FTP client such as Filezilla. Remember to require explicit SSL connections when configuring Filezilla, otherwise the connection will fail.

Conclusion
Your Ubuntu server is now setup with a simple FTP server for you to upload and store files. Congratulations!
See Also: (Live Webinar) Meet ServerMania: Transform Your Server Hosting Experience
Was this page helpful?

